Sheep Shearing Equipment For Beginners: Clippers And Blades
Thinking about shearing your own sheep? What equipment do you need to buy and why?
Let’s dig into what you need to shear your sheep and why you would need it.
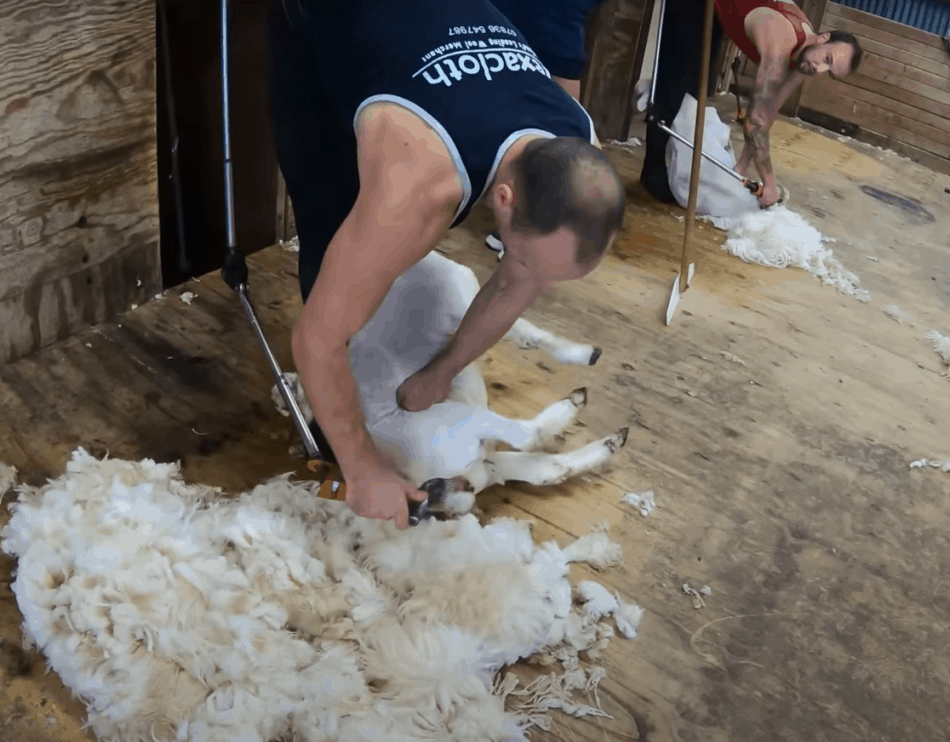
Sheep are shorn with a hand held machine called a clipper that has two blades, a comb and a cutter, which move horizontally to cut the wool.
Go to your local farm store or look up clippers and blades online and there will be tons of choices.
There are all kinds of comb shapes and sizes, cutter choices and different brands of clippers all looking like the one that would work for you.
Sorting all this out looks to be confusing!
While there are multiple choices, the things you need to look for actually are rather simple.
You just need clippers, upper and lower blades and oil.
Let’s look into each of these separately to help you get some clarity on the differences between the choices in each group and what will work best for you.
Clippers are electric and hand held
The clippers are the machine that you hold in your hand to shear the sheep.
It will be powered by electricity and have cutting blades that are able to be replaced as needed.
Clippers have cords or a power shaft
Broadly speaking, there are two types of clippers.
Corded clippers have a cord and clippers all together, like an other plug in appliance.
These are the commonly found clippers available in most farm stores or online at livestock supply stores.
The other type of clipper is more of a professional or heavy use machine that has a shaft powering a hand piece.
This type of clipper requires more to set up, it’s not just plug in and start shearing.
Note: Shearing machine is the phrase I use in the description for the type of clipper with shaft drive (flexible or straight), since it is significantly different than the corded models.
When referring to all machines that people use to shear sheep I will just use the word clipper(s).
We have and use both types of clippers on our farm. We just purchased a shaft drive clipper earlier this year.
We used it to finish up the last of this year’s shearing and will use it for all big group shearing from here out.
However, we still kept the corded clipper, a Shearmaster, that we are replacing.
Why keep the old clipper? It’s nice to be able to just grab the clippers and an extension cord and be ready to shear anywhere.
For a small job, corded clippers are ideal.
Once you decide on which clippers to get, check out my article Learn To Shear Your Own Sheep for the details on how we shear our sheep, including step by step instructions.
My husband has over 25 years of experience shearing for himself, starting with a few sheep he had as a teenager.
When you are ready to give it a try, we can help you get started!
Clippers with a cord for small jobs
Pros: Easy to find and less money to purchase, commonly priced from $300, come with a kit including a storage box and a set of blades, easy to get replacement blades
Cons: Not made to run for hours of shearing in one day
Overall: Great place to start when you are new. These clippers do have their limitations, the main one being they overheat with extended use.
However, if you are new to shearing, you will need some time to work up to hours of shearing anyway, so these are a good place to start.
Brand to purchase: We always used a Shearmaster clipper. I have also heard good things, from people that show livestock, about Oster and Andes.
Do not buy an off brand or a bargain brand. Stick with a well known name.
I qualified the above statement with the phrase “from people that show livestock” because at a livestock show your clipping will focus on precision and detail. It also needs to be quick to set up and portable.
At the show, the animal is starting out clean and the trimming is minimal (compared to completely shearing farm sheep).
Show preparation clipping is a different situation than that of most farm flock shearing.
The main difference being you are going to expect more heavy work from the clippers when shearing the flock at home.
This is not good or bad, just something to be aware of.
Hot clippers are being overworked
Please keep in mind if you are doing a lot of shearing, your clippers will get hot.
Not only are they harder to hold they are now operating in self destruct mode.
Hot clippers are overworking and headed towards burning up the motor.
If your clippers are warm, you need to take breaks between each sheep or have another set of clippers to use.
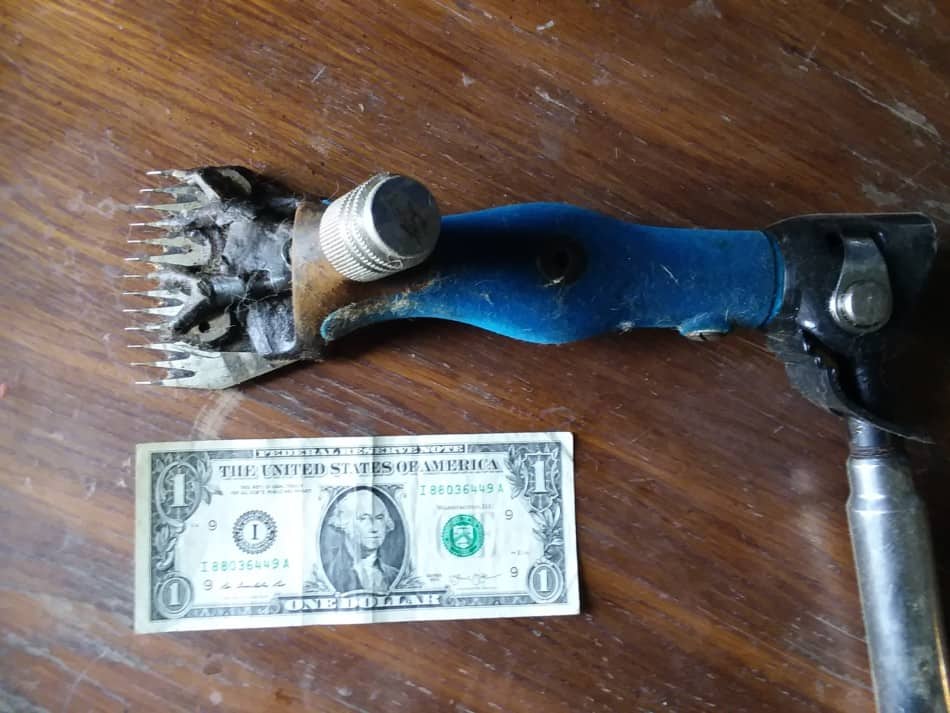
Shaft drive shearing machine for heavy use
The hand piece shown in the picture above goes to a shaft drive shearing machine. The dollar bill will give you an idea on the size of the hand piece.
Pros: Tough and made to go all day, more power, made with longer lasting materials and design, and run quieter than the corded clippers
Cons: Cost-the new Longhorn XT kit (entire set up plus 5 sets of blades) we got this year was $1,054.00, is less portable than a corded clipper and takes a little longer to get set up to shear
Overall: Great machine to use if you are doing a larger number of sheep! It has tons of power and can be used continuously for hours.
This machine set up should last for years and handle all of the shearing you are willing to do in a day. Shaft drive come in flexible shaft or rigid/solid shaft.
As mentioned above, we just purchased a flexible shaft Longhorn for ourselves. This was a big purchase for our farm this year.
We decided to get it since we are shearing 400 or so sheep a year and the Shearmaster was seemingly on it’s last legs.
We knew we were likely to be purchasing some sort of clippers before the next flock shearing, so we went ahead and ordered in the Longhorn.
The plan is that this should be our last clipper purchase, aside from blades, for quite some time.
We have to replace the corded clipper every few years, or at least find a new or used motor to put onto the old head when the current motor burns up.
Hopefully, we are done worrying about clippers making it through all the sheep.
The corded clippers are good for shearing sheep, just not as many sheep as we are shearing. We are over using/relying on the corded clipper.
We have been overworking the Shearmaster for a while now and decided to get a machine more suited to our needs.
It would have been cheaper for us, for this year, to buy another corded clipper. That must be pointed out.
If you are just getting started get the corded clipper and see how you like shearing sheep.
Once you know you love it, then upgrade to a shaft driven machine that will last.
Combs align the wool to be cut
The comb is the long lower blade that sticks out the furthest and goes into the wool first. The comb lines up the wool to be cut.
The teeth on the comb hold the wool upright while until the cutter zooms by and clips the fiber, like scissors.
The comb remains stationary, only the cutter moves to shear the sheep.
The name comb might throw you off a bit. The comb has a sharp edge, meaning it doesn’t just comb through the wool.
The comb is one of the two parts of the clipper that work together to cut the fiber.
Both the comb and the cutter have an edge that must be sharp in order to shear the sheep.
We like Burgon and Ball combs (and cutters). They are made in the U.K. and seem to hold up the best for us.
Differences in combs are teeth and shape
Combs come in a variety of shapes and sizes with the main differences being the number of teeth going into the wool and having a straight or winged outer tooth.
How To Set Combs And Cutters shows you how to put the blades on your handpiece, since there is a range in position available.
Comb number of teeth relates to fineness of cut
The more teeth on the comb, the finely or more precisely the wool can be cut.
Generally, you would use a comb with less teeth for full body wool shearing, since this style of comb will make shearing go much quicker.
A comb with more teeth takes longer to shear an area and is used for precision work, like grooming for a show.
We use a 13 tooth “goat ” comb. I have no idea why it is called a goat comb! Just remember the 13 tooth part.
More teeth than this will be slow to use, less teeth than this will be hard to find and much more likely to grab skin and cut the sheep.
Occasionally, you will cut one of your sheep.
Using a comb with 13 teeth limits the amount of skin the clippers can grab, keeping down the size of the cut. Don’t let this give you false confidence!
You still need to be careful when using the 13 tooth comb.
Outer tooth can be straight or flared
- Straight tooth
- Flared edge/ tooth
Beginner Friendly Straight Tooth Comb-The most common comb tooth shape is just what you would expect, straight.
If you are new to all this shearing stuff, here’s where you need to start. The straight tooth comb is the simplest to use and most beginner friendly.
In the picture below on the right, you can see the teeth are all straight. The leading edge of this comb would enter the wool in the middle of the comb first.
The front of the comb is rounded to to put the side teeth further back from the cutting edge than the middle.
This makes the pass of the clippers a bit narrower but also less grabby, since the cutter would stay the same distance from the ends of the comb teeth.
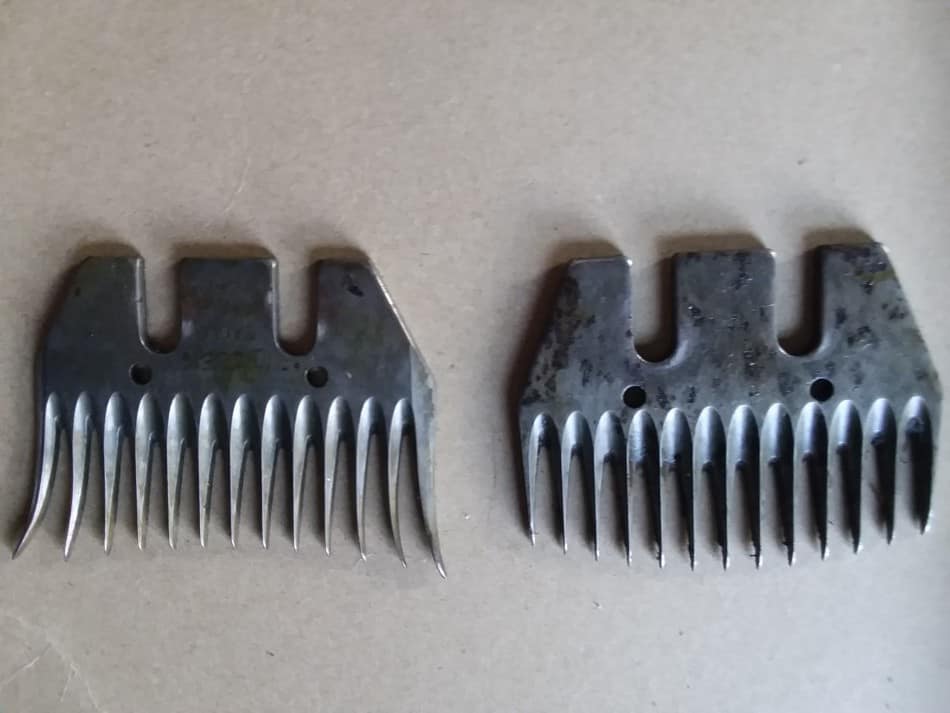
Flared Tooth Comb-Some combs have a flared edge or a flared outer tooth.
This flared tooth is a bit longer than the rest of the comb and is made to gather in extra wool for the cutting pass.
The thinking being making the pass with the clippers a little wider so you need less swipes over the sheep to finish shearing, since you would be getting more wool per pass.
You can see from the picture above that the leading edge of this comb is curved back toward the clipper head in the middle.
The teeth on the edges of this comb would enter the wool before the teeth in the middle.
Is flare tooth better to use when shearing sheep? The jury is still out on this one. My husband feels that the flare tooth helps to smooth the skin making it less likely to cut the sheep.
However, he was talking to some professional shearers who said that using the flare tooth comb increased cuts on the sheep.
They felt the flare tooth comb was more likely to pull and/or bunch skin, along with the extra wool gathered, which would increase the chance of cutting the sheep.
Use all of one comb style before switching blades
Use all of your flare tooth or straight tooth combs in a row (if you have both kinds). Switching back and forth can mess up your thinking.
Different designs work differently, that is the whole point of the design change.
You will be faster and more accurate if you keep to one type of comb before switching to the second type in the same shearing session.
Keep in mind that neither style is better than the other. They both have the area or type of shearing they are designed for being best at.
Feel free to just stick with the straight tooth comb, nothing wrong with simplicity!
Overall, if you find yourself doing lots of shearing work in tight spaces, like when you would almost have to “carve out” the wool, then the straight tooth is your best shot.
If you just want to shear as much wool per pass of the clippers as possible, then the flare tooth is the one for you.
Please start with the straight edge if you are a total beginner!
Keep used blades oiled
When you switch out dull blades, keep your comb oiled or leave it “dirty”.
The “dirt”, of course, is grease from the wool and will prevent your comb from rusting.
If you clean off the build up, remember to oil the comb before you store it to prevent rust.
Cutters are the blades that move
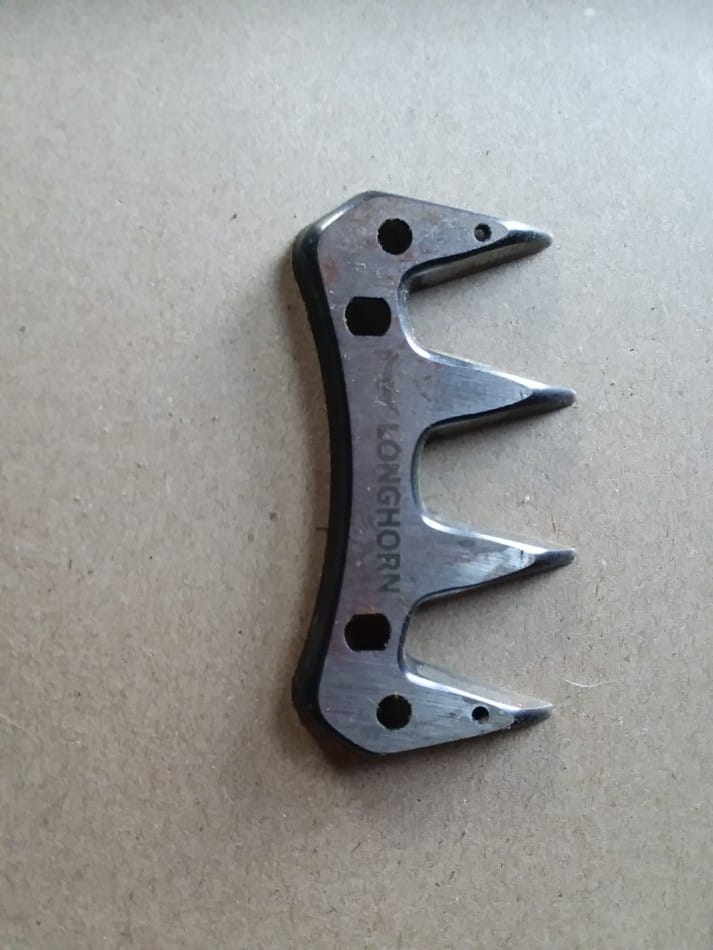
The cutter is the only blade that moves when shearing and sits directly on top of the comb. Compared to the comb, the cutter is small.
The cutter is held on to the clipper head by the arm that goes back and forth over the comb to make the cut.
The arm has downward pressure from a spring that keeps the comb and cutter together.
The arm has forks that grab the cutter with short posts that go through holes manufactured into the cutter.
While there are many different cutters, we don’t notice a difference in results, as long as you stick with high quality brands.
The biggest thing we have noticed is the cutters (and combs for that matter) that are thicker, meaning made with more metal, seem to be able to be sharpened more times.
Each time the blade is sharpened a little bit of the metal is ground away, so the blade is then thinner.
The comb and cutter are pushed together with a spring, to keep the cutting edges tightly against each other.
Eventually, the repeatedly sharpened blades will be too thin for the spring to hold them together well.
We use Burgon and Ball cutters (and combs). They hold up the best for us and seem to resharpen well.
Shearing requires shearing oil
As far as other items to have on hand for shearing, you really just need to have a shearing oil.
Our new shearing machine came with a bottle of shearing oil, a first for us.
Before this we just used 3 in 1 oil from the store. It’s very common in places that sell hardware.
You may see on an aerosol lubricant in the shearing blades section of your farm store. Please understand this is to keep the blades cooler, not to oil them.
If your blades are hot you are overworking the machine.
Even if you choose to use the aerosol you will still need a liquid oil like the 3 in 1 oil to properly lubricate your clippers.
Have a wool bag ready
Other than oil, you just need a place to put the wool. Not a garbage bag! The wool needs to breathe or it will mold.
You are going to be putting in a lot of work here shearing, don’t cheap out on the bags.
The places that buy wool will sell you bags to use or you can get them from Mid States Wool Growers.
When you take the wool in to sell, the wool buyer will keep the bag and give you a replacement. The first set of bags you have to buy.